
I’m super excited to share a project that is not only decorative, but super functional: The hidden, folding craft table. I bought a Cricut recently and needed space to store it and to do all my projects. My office also double as a shoe room, so the space is very limited. The only corner of the room I had open currently stored my purses (see picture below), so I need a way to use the whole space, still store my purses but also hold my Cricut and other supplies.

Office Before
I started searching the internet and found these awesome desk plans from Shanty 2 Chic, which became the inspiration for this project. We were originally going to buy a short Billy bookcase from IKEA and build this desk to go on top of it; but after a lot of thinking and planning, my husband and I decided to keep the look of the shoe wall going and use a large Billy bookcase and attach a table to it.
Where to Buy the Materials…
We bought everything we needed from Lowes except for the paint, which came from Joanne Fabrics. I had some left over gold craft paint and I decided to use chalk board paint for the table since I thought it would be cool to have a craft table I could write on if I needed to.
Before I list the materials needed, let me tell you about our wood experiment. We first visited the IKEA clearance section and bought some scrap white “wood” thinking it would be perfect since it would be the same color and material as the shelves:

White shelf pictured with the wooden legs from Lowes
We tried to cut this wood and it went horribly. Maybe if we had a table saw it would’ve been easier, but it was not what we wanted. We went back to Lowes and bought some plywood boards which turned out to be much easier:

Plywood boards after they were cut
Materials Needed
Wood for the Table (we used four pieces of 1″ plywood, 72×8, cut into 40″ pieces)
Wood for the Legs (we used 1.5″ wide square legs because I wanted it to look like a frame around the table top. See image above for the a picture of the legs we used. Legs were 40″ long. You will also need two 27.5″ pieces to complete the frame).
Wood Glue
6 Strong Magnets
A Latch
6 Hinges
A pocket hole jig
Wood Filler
Screws
Clamps
Drill
Sandpaper
Billy Bookcase from IKEA
Chalkboard paint (or whatever you want to paint the table in)
Gold paint (or whatever color you want to paint the frame)
How to Create the Table…
Step #1, cut the wood. We tried to have Lowes cut the boards for us, but for some reason the employee could not cut the boards in the correct length, so we just did it ourselves. We used the full width of each board, so no need to cut any of the width off the plywood! The table top is ~30×40 (the height is 40″, the width is about 29. Again we didn’t change the width of the boards, so just use what you have), the legs are 40″ long and the top and bottom frame pieces are about 27.5″. The legs we chose were about 1.5″ wide and we wanted them to act as a frame to the board, so we measured the top and bottom pieces based off of that (Better description with picture below).
Once the wood was cut, it was time to put the table top together. My husband used a pocket hole jig to drill three holes into three of the boards to attach them together. I unfortunately did not get a good picture of this but here is what I did get. You can see that there are pocket holes near the end of each board where you put the screw through to attach the boards. Before screwing the boards together, he used wood glue along the edge to secure the pieces together.

After attaching the wood using the pocket holes and the glue, he used clamps to hold the wood together very tightly. He used scrap wood on the top and bottom to make sure the top dried straight. This is very important so you don’t have uneven wood pieces for your table top!

While the top was drying, he put together the legs. The legs and the top part of the frame were all one piece. My husband used a pocket hole jig and glue in the same way he secured the table top, to secure the legs to the top of the frame. So in the end you end up with a U shape with the 27.5″ leg piece in the middle and the two 40″ legs on the outside. This picture skips a couple of steps but just so you get an idea of how the legs are put together.

Next, we built the Billy Bookcase according to the IKEA instructions and anchored it to the wall. Do not skip the anchoring step. The shelf will fall on you if you don’t anchor it!! We left the shelves out of it until we were done installing the table.

After the table top was dry, he sanded it really well so it was smooth and flat. Now it was time to add the legs! He used hinges to attach the legs to the table top so the legs equally hung off of each side to make the frame (see the picture below). Make sure you attach the legs to the board with the pocket holes facing the table so you don’t have to cover those up in the end!

When we tested how far the legs came out, my husband decided he wanted to glue some quarter round to the top of the frame to act as a stopper so the legs did not go out too far. He just used wood glue to secure some quarter round to the top of the legs.

When that dried, he glued the bottom piece onto the table top to finish the frame look:

Next, we filled in the pocket holes on the top with some wood filler. We let the wood filler dry and then sanded it down so it was smooth. You wouldn’t even know there were holes in it!

Next it was time for some paint. I painted the legs gold and the table top and bottom chalkboard. The gold required about four coats and the chalkboard paint required two according to the instructions. When it was dry, it was time to install the table top on the bookshelf!
Installing the Table Top on the Bookshelf
We used clamps to attach the board to the middle of the bookshelf and then screwed three hinges onto it.

Next, we installed the magnets. We used magnets that were right under 1/2″ and a 1/2″ drill bit to drill small holes for the magnets. We secured the magnets into the holes using super glue. We attached the magnets on the top of the bookcase first, then measured on the table where the other magnets should go to line up with the top.


Originally we thought we would just be able to secure the table with the magnets and it did hold it, but it was not stable at all. If you hit the bookshelf it would fall and we obviously didn’t want that for safety reasons. So we installed a latch on the side for extra security.
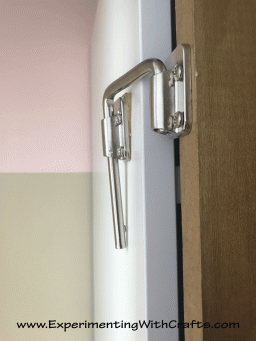
I like having both the magnets and the latch because it’s really easy to fold up and put the latch on. When you undo the latch, the table doesn’t just fall on you since it’s held by the magnets, which is a definite plus.
The table was now complete! It looks like a picture when it’s up on the wall and when it pulls down, it becomes an awesome craft table. 
Now it was time to turn it into a picture. It took me a while to decide on the quote I wanted, but ultimately, I decided on a quote from Kate Spade, “She’s a Dreamer, A Doer, A Thinker. She Sees Possibility Everywhere“. I thought that was perfect since I’m absolutely obsessed with Kate Spade and it really ties together my shoe/ purse storage and the craft table. I used my Cricut to cut the vinyl and adhere it to the board. I love the way it turned out!!

I put the shelves in the bottom for my purses and then put a shelf in the top to hold some extra Cricut supplies like vinyl scraps and transfer paper. I attached command hooks to the back to hold my cutting mats.


I found the idea of using IKEA bag holders to store my vinyl on Pinterest and it works perfectly! They did fall off the wall through when I tried to use the sticky tape that came with it, so I will have to go back with a nail to attach them to the wall.

So there you have it! I now have a space in my office that stores my purses, adds some extra decor and personality with a picture frame and then folds out into an awesome craft table which has been amazing for making Cricut projects.


The corner looks much better than it did before (see first picture above) and I think my shoe wall looks so cool now! Here is a complete view of my office now that I got a new fancy wide angled camera lens:

Here is my office again with the table folded down:


That is a beautiful table and you did a great job building it. It also is a space savor. Your blog looks nice and you have good stuff to share. Welcome to blogging. If you are on FB. Please come join our fb group to meet other bloggers. You can find the link on my blog’s about page. Your new followers. Stay blessed and stay connected.
LikeLike
You did an amazing job putting that all together! Love how organized the room looks!
LikeLike
Thank you so much! It’s a difficult room because I have so much crammed in there. I’m still trying to figure out the best way to organize the other side which houses all my office stuff ha ha. We are about to put new floors in and paint in there so we will see what I can do!
LikeLiked by 1 person
Anxious to see what you do with it!
LikeLiked by 1 person